Thursday 27 December 2012

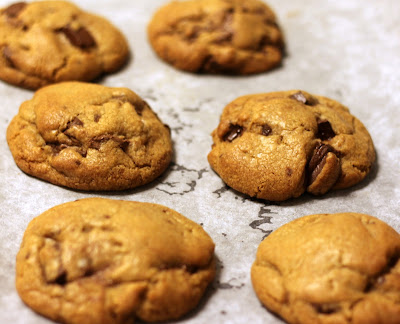
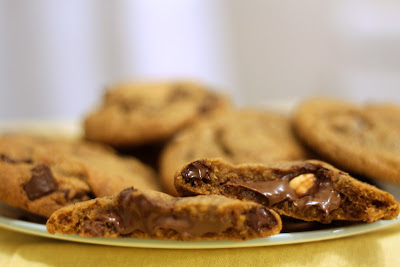
Nutella and hazelnut-stuffed browned butter chocolate chunk cookies


Nutella and hazelnut-stuffed browned butter chocolate chunk cookies

So that’s it, Christmas is over and most of us are probably eating leftover turkey sandwiches (I’ll have mine with a wedge of brie and a dollop of cranberry sauce please) whilst contemplating the plans for New Year’s Eve.  At the risk of sounding like a grumpy old woman, I must say, I’ve never been a huge fan of New Year’s.  For me, it comes second only to Valentine’s Day (don’t get me started!) as an over-hyped ‘holiday’ designed to make most people feel pretty pants about themselves.

I cannot be alone in thinking thus.  The pressure to go out on New Year’s Eve and have a wonderful time is surely enough to give anyone a nervie b and - for me anyway - 9.9 times out of 10 it’s an anti-climax.  So much so in fact that usually I am more than happy to stay indoors, comfy-cosy in my PJs, watching all the commotion on television and trying – usually unsuccessfully - to stay awake long enough for the countdown.  Perhaps it’s a sign of my age…

Nutella and hazelnut-stuffed browned butter chocolate chunk cookies

Having said all that, this year, I’m doing a volte-face.  I’ve been invited to a house party you see, which, not only do I plan to go to, but I actually plan to get dressed up for (yes my friends, rejoice, the pyjamas will be shed!) and whatever happens darn it, I will have, not just a good time, but like, oh-my-God, just like, the most super-amazing time, like everrrr!!!

Of course, after the big night out will come the inevitable New Year’s resolutions to detox/lose weight/start exercising/[fill in with your resolution of choice].  But before all that, should you want to make the most of the remaining few days to indulge (until we all give up on our resolutions that is), I can’t recommend these Nutella-stuffed chocolate chunk cookies highly enough.  I came across them on the fantastic blog Ambitious Kitchen.  Admittedly, they take a bit more time and effort to make than your average cookie, both because of the beurre noisette* and the Nutella filling, but I can guarantee you, Cookie Monster would definitely approve!


Nutella and hazelnut-stuffed browned butter chocolate chunk cookies


These cookies are chewy, soft and buttery with a secret stash of Nutella hiding away in the centre, ready to shout 'BOO!' out at you when you bite into it!  Ideally, they're best eaten on the day of baking, whilst the Nutella centre is still soft and gooey.  Yummo!  I tweaked my cookies ever so slightly by adding a whole hazelnut into the centre of the Nutella, à la Ferrero Rochers, and by omitting the sea salt (mainly because I forgot to sprinkle it on while the cookies were still hot.  Doh!)

*Beurre noisette is brown butter.  If you’re nervous about making it, there are online guides on how to do so.  This how-to, on Ambitious Kitchen’s website saw me through the process (after I’d burnt my first lot!): http://www.ambitiouskitchen.com/2012/12/how-to-brown-butter-a-love-story/


Makes around 20 cookies
  • 20-25 whole hazelnuts
  • 335g plain flour
  • 1¼ tsp bicarbonate soda
  • ¼ tsp salt
  • 220g unsalted butter
  • 210g dark brown sugar
  • 45g granulated sugar
  • 1 large egg plus 1 egg yolk
  • 1 tbsp plain greek yogurt
  • 1½ tsp vanilla extract or 1 tsp vanilla paste
  • 250g chocolate chunks (I used 40% cocoa but you can use darker if you prefer.  I think milk chocolate would make the overall cookie too sweet – it’s very sweet as it is!)
  • 1 jar of Nutella, chilled in the fridge (200g should be enough, but it might be safer to buy a 400g jar. After all, anything you don’t use up for the cookies, you can just polish off with a spoon!)
To start, toast the hazelnuts by placing them on a baking sheet and popping them in the oven at 180C (160C fan) for 7-10 minutes.  Check them periodically to make sure they aren’t burning.  Once toasted, leave to cool, then rub gently in a clean tea towel to remove as much of the papery skins as possible (the skins can be bitter which is why they're best removed).

Sift the flour, bicarb and salt together into a bowl and set aside.

To make the brown butter, or beurre noisette, melt the butter in a saucepan over a medium heat. The butter will begin to foam. Make sure you whisk consistently during this process.  After a couple of minutes, the butter will begin to brown on the bottom of the saucepan.  Continue to whisk and remove from heat as soon as the butter begins to brown and give off a nutty aroma.  Immediately transfer the butter to a cold bowl (either chilled in the fridge or over some ice) to prevent burning. Set aside to cool for a few minutes.

Once your butter has cooled, with an electric mixer and a K-beater attachment, mix the butter and sugars until thoroughly blended (a good few minutes).  Then beat in the egg, yolk, yogurt and vanilla until combined.

Next, add the sifted dry ingredients in thirds, beating on a low speed until fully incorporated.

Finally, fold in the chocolate chips.

Chill your dough for a minimum of two hours in the fridge, or even overnight if you can wait that long (a chilled dough results in a softer, chewier end cookie, so you really need to dig deep for some willpower and make sure you go through with this step, rather than skipping it and rushing to make the cookies so that you can eat them sooner!)

Once the dough is chilled, preheat the oven to 180C (160C for a fan oven) and line three or four baking sheets with greaseproof paper (if you don’t have this many baking sheets, don’t worry, you can bake the cookies in batches).

Measure out about 1½ tablespoons of dough at a time and roll into a ball. Flatten the dough ball very thinly into the palm of your hand or onto your work surface.  Place a generous teaspoon of chilled Nutella in the middle and gently push one hazelnut into the Nutella.

Raw Nutella and hazelnut-stuffed browned butter chocolate chunk cookie

Now fold the dough around the Nutella, encasing the Nutella and hazelnut inside the dough.  Gently roll the dough back into a ball, making sure that the Nutella is not seeping out.

Place dough balls onto your baking sheets, about two inches apart to allow for spread as they bake.

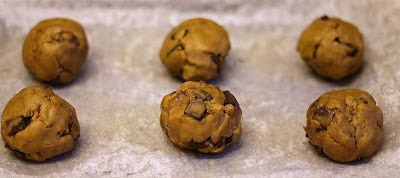
Raw balls of Nutella and hazelnut-stuffed browned butter chocolate chunk cookies

Bake the cookies for 10 minutes until the edges of the cookies begin to turn golden brown. They may look a bit underdone in the middle, but will continue to cook once out of the oven.

Cool the cookies on the sheets for five minutes before transferring to a wire rack to cool completely.

Thursday 13 December 2012

Christmas Rocky Road


2012 has been rather a topsy-turvy year. More turvy than topsy if you really want to know. Indeed, I'm going to take the liberty of quoting Queenie in saying that 2012 "is not a year on which I shall look back with undiluted pleasure…it has turned out to be an Annus Horribilis." (The Queen actually said this in reference to 1992, but being only 12 years old at the time, pretty much all I can remember of that particular year was having to wear a hideously itchy and unflattering school uniform - a look which was completed with oversized plastic-rimmed NHS specs, acne and frizzy, untamed hair - and being madly in love with Mark Owen. Agreed, not my finest year, but equally not an Annus Horribilis for me).

Whilst there have been some highlights in 2012, including the birth of my most scrumdiddlyumptious nephew and a recent sojourn to Italy where I spent most of my time feasting on beautifully fresh and flaky Nutella pastries, the lowlights have unfortunately far outnumbered these. I am not going to elaborate on my tales of woe because a blog about baking and cakes is no place for sorrow, but suffice to say, I shall be very relieved when the clock strikes midnight on 1 January 2013...assuming that is, that I don't fall asleep at 11.55pm, which, being the cotton-headed ninnymuggins that I am, is more than likely.


Still, it wouldn't be fair of me to wish away what remains of 2012 just yet. Not when one of the best parts of the year - Christmas - is yet to come. Most people are gearing themselves up for the big day now, with office parties, menu planning and present shopping. If you're going to a party and don't want to turn up empty-handed, or you're struggling to find a certain person a gift, I find a homemade edible gift is always a winner. I took these Christmas Rocky Roads - so-called by me because they are packed with Christmassy ingredients such as ginger, orange and sultanas - to a Christmas party recently and they went down a storm. They'd also make a great present wrapped up in some cellophane with a pretty ribbon, and the best part is that they're extremely easy to make.


P.S. I'd say these are more suited to the grownup palate, but if you wanted to make them for children instead, you could perhaps substitute the stem ginger with marshmallows.

Adapted slightly from Mary Berry
  • 200ml double cream
  • 300g Bourneville chocolate (or any good quality chocolate with 40-50% cocoa content)
  • 50g butter
  • 25g caster sugar
  • 200g ginger biscuits, broken into small pieces
  • 75g stem ginger, chopped into small pieces
  • 100g sultanas
  • Peel of two oranges, coarsely grated
Line a 18cm (7") square tin with a strip of parchment paper across the base.

Measure the cream, chocolate and butter into a bowl and melt gently over a pan of just simmering water until runny and melted (make sure the water in the pan does not come into contact with the base of your bowl). Stir occasionally to combine the melting ingredients. Be careful not to overheat.

Add the caster sugar, biscuits, ginger, sultanas and grated orange peel. Stir together and pour into the tin. Level the surface then chill your molten chocolateyness in the fridge for 4 hours until firm.

Turn onto a board, remove paper and cut into small squares.

Sunday 25 November 2012

Oatmeal raisin cookies


Christmas is coming and I, for one, am excited.  I know it’s still November, but I've already succumbed to having Christmas songs on in the background whilst I get on with my day (yes, they’re playing right now), and I’m beginning to feel that magical glow slowly spreading through me that only comes this time of year.  You know what I'm talking about, that warm feeling associated with watching Christmas films you’ve already seen umpteen times (my personal favourites are Elf and Home Alone), eating clementines and chestnuts, and walking past all of the houses in the neighbourhood beautifully lit up with Christmas decorations.

What baffles me is why I feel like this, since I don’t actually celebrate Christmas and never have.  I’ve never had a Christmas tree in my house, never got to open an Advent calendar and never woken up on Christmas morning to an abundance of presents.  Whilst this used to sadden me as a child and I felt a grave injustice had been done to me, perhaps it’s because I’ve never celebrated Christmas that it feels so special to me?  What I mean is, perhaps it’s because Christmas is something almost elusive, something that I have always yearned to be part of but have never quite been privy to, that it holds a magical mystery for me.  Or perhaps it’s not actually the day itself, but the build up to it that I love: the Christmas cheer, the plethora of chocolates in the office, the fairy lights and tinsel brightening up the dark winter nights.  In fact, I’m pretty sure that’s it - the world seems a happier, merrier place, just for one month and that is why I think Christmas is, quite frankly, absolutely T for Tremendous!


Now, maybe I've been a tad disingenuous painting this sad picture of a little girl who never got to celebrate Christmas, because whilst it’s true that I’ve never had the tree and presents or written a letter to Santa, my family has always had a big get-together on Christmas Day, when we over-indulge as much as the next family in a juicy roast with all the trimmings, followed by a few desserts, followed by a few boxes of chocolates, followed by seconds...!  What can I say, when you come from a family that loves food as much as mine, we’ll look for any excuse for a feast and Christmas provides the perfect one!

So to kick off the Christmas indulgences, I made a batch of deliciously soft and chewy oatmeal raisin cookies.  Not perhaps traditional Christmas fare, but the cinnamon in them certainly evoked a warm Christmassy glow in me.  They’re easy to make, quick and a great alternative to giving someone a box of choccies.


  • 300g plain flour
  • ½ tsp bicarbonate of soda
  • 190g butter, melted and cooled
  • 175g soft light brown sugar
  • 113g caster sugar
  • 1 tsp cinnamon
  • 1.5tsp vanilla paste or 1 tablespoon pure vanilla extract
  • 1 large egg, plus yolk from 1 large egg
  • 155g oats
  • 170g raisins
  • 35g desiccated coconut

Preheat the oven to 180C (160C fan) and line two or three baking sheets with parchment paper.

Sift together the flour and bicarb and set aside.

Beat the melted butter, brown sugar and white sugar together until well blended (I used a handheld electric mixer), then add the cinnamon, vanilla, egg, and egg yolk, beating for another 2-3 minutes until light and creamy.

Add the sifted flour and bicarb, mixing until just blended, then, with a large spoon, fold in the the oats, raisins and coconut.

If you want extra soft, chewy cookies – and I think you’ll find you do :) – chill the dough in the fridge for a minimum of two hours, but ideally overnight.

Place balls of dough onto the lined baking sheets.  I used a tablespoon measuring spoon to scoop out the balls of dough and ensure they were all roughly the same size and gently rolled each ball into a nice round shape.  These cookies don't spread like other cookies might, so you can place them fairly close together without worrying they'll all merge into one giant cookie.  For flatter cookies, gently press down the top of each ball of dough.

Bake for 12 minutes for soft, chewy cookies, 15 minutes for a firmer cookie.  Resist the urge to overbake - the centres should still be soft when the cookies come out of the oven.  They will firm up as they cool.

Let the cookies rest on the baking sheets for about five minutes before transferring to a cooling rack.

Monday 12 November 2012

Bounty (chocolate and coconut) layer cake


Coming back from holidaying abroad is always a painful business.  This is especially so when you live in the UK, because much as you are willing the sun to be shining as your plane hits the tarmac, deep down you know that when you look out of the tiny window of your aeroplane as it touches down, the weather outside will be bleak and grey.  Thus I am resigned to the fact that, as long as I live in London, whenever I arrive back from a holiday and step out of the airport, a biting chill is likely to greet me.

Sometimes it seems I am alone in this resignation; I’m always rendered awestruck and incredulous by fellow British travellers who return from their holidays dressed in shorts and flip flops.  You know the ones I mean, showing off their sunburnt skin in a short-sleeved t-shirt and often sporting a sombrero around their necks to complete the look.  Do they think, maybe, just maybe, if they keep dressing like this every single time they return from a holiday, one day they might magically manage to bring the weather back with them?  I’ve decided it’s best I don’t shatter their illusions by informing them it’s not going to happen, and instead watch them with mixed emotions of pity and smugness as they leave the airport gasping as the cold air hits them.


Anyway, I’ve digressed (not unusual, but I apologise nonetheless).  My point is that when you come back from a holiday, in all likelihood, you’re going to suffer from the post-holiday blues and so my not-so-secret tip for combatting this is to have something else to look forward to on your return.  Last year, after my holidays, I had arranged for a ‘Manly Baker Bake Off’ to take place in the office when I got back.  Each of my male colleagues had been set the challenge of baking a dozen frosted cupcakes of their choice, for me and fellow female colleagues to taste and judge.  This year, following a lovely little jaunt to the Amalfi Coast, I get to look forward to round two of the ‘Manly Baker Bake Off’!

The challenge I set this time around was for colleagues to bake a chocolate-bar inspired layer cake.  Of course, the reason I decided on this challenge was purely innocuous, nothing to do with the fact that it means I get to scoff five or six different CHOCOLATE(!) cakes…  Having set the challenge, I thought I’d better actually check whether I’d be up to it myself, and so I made this inside-out Bounty cake: chocolate sponge on the inside and a white cream cheese frosting, flavoured with fresh coconut* to sandwich it together and decorate.  The chocolate sponge recipe comes, rather aptly, from the winner of the 2011 Great British Bake Off, Jo Wheatley.  I’ve wanted to try it out for a while and I must say, it didn’t disappoint in the slightest – moist, dense and, as Jo describes, ‘well-behaved’, therefore easy to slice for layering.  It also worked just perfectly with the fresh coconut cream cheese frosting.  For me, this Bounty cake recipe is a keeper.

*A note on using fresh coconut.  I know first hand how time-consuming it is to shell, peel and grate a fresh coconut, but trust me, the creamy and moist flavour adds to this cake in a way desiccated coconut never will, so please, please, please try it, at least once, for my sake.  If you don't know how to shell a coconut, there are plenty of videos online where you can learn. It's not that hard, I promise!


Chocolate mud cake from Jo's Blue Aga.  Coconut Cream Cheese frosting adapted from Delia's How to Cook, Book One.

For the cake:

  • 165 g unsalted butter, softened
  • 300 g caster sugar
  • 3 large eggs
  • 65g self-raising flour
  • 200g plain flour
  • 1tsp bicarbonate of soda
  • 70g cocoa powder
  • 200ml of soured cream
  • 50g cream cheese

For the cream cheese frosting:

  • One fresh coconut, shelled and peeled: of this you'll need 40g finely grated and 100g (or however much remains) coarsely grated
  • 250g mascarpone
  • 200g fromage frais
  • 1tsp vanilla extract
  • 100g icing sugar, sifted

Preheat oven to 180C (160C fan).

Grease and line one 8 inch, deep round tin, or two 8 inch sandwich tins.

To make the cake, beat together the butter and caster sugar until fluffy and pale, then add the eggs, one at a time, beating the mix after each egg is added.

Using two large bowls, sift the flours, bicarbonate of soda and cocoa powder together three times.  In a separate bowl, or jug, mix together the soured cream and cream cheese.

Now tip half of the flour mix in with the beaten butter, sugar and egg mix and fold together, before adding half of the soured cream-cream cheese mix and folding again.  Repeat.

Spoon the mixture into your tin and bake for 60-75 minutes, until a knife or skewer inserted into the cake comes out clean.  Leave to cool before removing from tin.

To make the frosting, place all of your ingredients, except the 100g coarsely grated coconut, into a bowl and beat together until smooth.

If you've made one large cake, once it has completely cooled, slice into two or three layers.

To assemble, spread a thin layer of frosting onto the bottom layer of your cake, then place the second layer on top, to sandwich the two layers together.  Repeat process if you have a third layer.  Use remaining frosting to cover the outside of the cake, both on top and the sides.

Finally, cover the top and side of the cake with the coarsely grated coconut, pressing it down lightly with your hands to ensure it sticks to the frosting.

Tuesday 30 October 2012

Lemon and pistachio polenta cake (gluten free)

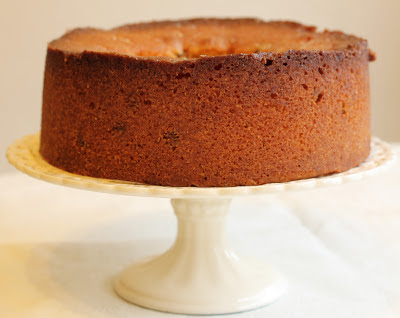
 Lemon and pistachio polenta cake (gluten free)
However much of a parody of herself she may have become, with the coy glances into the camera whilst she naughtily licks something decadent from her fingers or her flouncy, flowery phrases purred demurely at the viewer in such a way that one almost thinks she should only be on post-watershed, there are two points regarding Nigella Lawson on which I will not be swayed: number one, she always has been and still is impossibly beautiful; and number two, her baking recipes will never let you down.
On the subject of her beauty, surely no one could be in disagreement with me?  Burkini-gate excepting (we’ve all committed the odd fashion faux-pas in the past, surely we can forgive Nigella that one?) I am sure I have never seen her looking anything less than glamorous, even when she’s padding down the stairs in her dressing gown for one of her, seemingly nightly, midnight feasts.  Half the time when I’m watching her programme, I don’t know if I’m sighing in wonderment at the food or her beauty!  As for her baking, if you have never tried one of Nigella's recipes, trust me they don’t disappoint, and the cake below only served to strengthen my unfaltering belief in the Domestic Goddess!
This cake is naturally gluten free.  When I say ‘naturally’, I mean it doesn’t call for gluten-free flour or any other such specially manufactured gluten free ingredient; it simply replaces the flour with other natural ingredients: polenta and ground almonds.  As such, it’s ideal if, like me, you have family or friends who are gluten intolerant and you want to whip something up for them without having to purchase an array of gluten-free baking products.

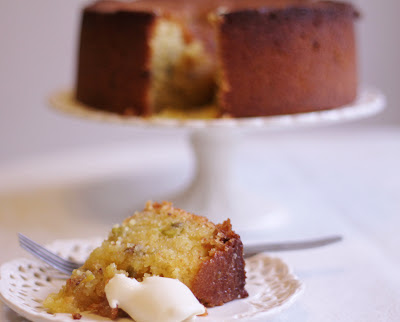
Lemon and pistachio polenta cake (gluten free) with extra thick double cream

This is a straightforward, no-fuss cake to make and you’re rewarded with a squidgy, damp, sweet but sharp end product that melts in the mouth.  Don’t be alarmed if the cake sinks in the middle once you take it out of the oven or if you find it’s rather crumbly – polenta and ground almonds will do that to a cake - it’ll still taste great.  I added pistachios to complement the lemon and I’d also recommend a healthy dollop of extra thick double cream/clotted cream/mascarpone (heck, all of the above if you’re so inclined.  Who am I to judge?!) on the side to mellow out the sharpness of the lemon.


Slice of lemon and pistachio polenta cake (gluten free)

Adapted from Nigella

For the cake

  • 200g unsalted butter, softened, plus extra for greasing
  • 200g caster sugar
  • 200g ground almonds
  • 100g polenta
  • 1.5 tsp baking powder (gluten free if required)
  • 3 medium eggs
  • Zest of 2 lemons
  • 40g shelled pistachos, roughly chopped

For the syrup

  • Juice Of 2 lemons
  • 85g icing sugar
Plus some thick double cream, clotted cream or mascarpone to serve

Preheat the oven to 160C fan.

Line the base of a 7" or 8", deep cake tin with greaseproof paper and grease the sides lightly with butter.

Beat the butter and sugar till pale and whipped (I always use the K-beater in my freestanding mixer for this.  Ideally you want your butter and sugar to be as light and pale as fresh cream).


Mix together the almonds, polenta and baking powder, and beat some of this into the butter-sugar mixture, followed by one egg, then alternate dry ingredients and eggs, beating after each addition.


Finally, beat in the lemon zest and the pistachios and spoon the mixture into your prepared tin.  Don't be alarmed if the mixture is a bit stiff and heavy, the ground almonds and polenta will make it so.


Bake in the oven for about 45 minutes until a cake tester or knife inserted into the deepest part of the cake comes out fairly clean.

As soon as your cake is out of the oven, leave it in the tin and prepare your syrup by heating the lemon juice and icing sugar together in a saucepan until the liquid starts boiling and all the icing sugar has dissolved.

Lastly, prick the top of the cake all over with a cake tester or a thin knife and pour the warm syrup over the cake.

Leave to cool before taking the cake out of its tin and serving with cream.

Thursday 27 September 2012

Chocolate orange marble cake


September.  Along with January, it’s my least favourite month of the year; when each of the two is over, I generally heave a big sigh of relief.  Why do I dislike these months so much?  I suppose, for one, because I will forever associate them with that ‘back-to-school feeling’.  On top of that of course, the weather is usually abysmal, summer and Christmas respectively are over, there are no more bank holidays or festivities to look forward to until what feels like an eternity and well, everything just feels rather ‘urgh’.

This year though, I decided I was going to make a stand and say ‘No, September!  You shall not get the better of me!  No siree!’  So to combat the humdrum of this rather drab and bleak month, I lined up lots of exciting things with which to occupy my time: I started Spanish classes, I booked myself a holiday and I packed my weekends with fun-filled events.  In fact, the weekend just gone, I attended a cake and bake show where, most excitingly, I got to meet the ‘Queen of Cakes’ herself, Mary Berry.

Now, just as teenage girls dream about meeting their idols and think up ways of how they might get the attention of the likes of Justin Bieber or Harry Styles if such a meeting were to occur, so I have been dreaming about meeting Mary and how I might get her to notice me.

I had it all planned out: our eyes would meet across the vast expanse of Earl’s Court, we’d run towards one another (yes, this bit is to be pictured in slow motion), meeting in a warm embrace, then she’d agree (simply because she clearly is that lovely) to be my surrogate grandmother and we would spend the rest of our days happily baking together in her presumably large and cosy farmhouse kitchen complete with wood-burning oven...


Hmm.  Turns out in the melee of thousands of other baking fanatics, she barely even noticed me and, for fear of a restraining order, when the moment came, I decided a hug may be a step too far, instead settling for a rather sheepish and feeble ‘hello’.  Still, I haven’t given up hope that one day our paths will cross again and, if nothing else, perhaps I’ll just get to have a nice natter with her about all things cake for five minutes.

In the meantime, meeting Mary inspired me to get baking again immediately, so the next day I made this chocolate orange marble cake, which I’ve been working on the recipe for for some time (I know, I know, I should just change the name of this blog to 'Chocolate Orange solves everything'!)  It's a lovely moist cake, with just a hint of orange to complement the chocolate and just the right amount of frosting on top.  The best bit is that I got to try out my bundt tin for the first time, but if you don't have one, a standard tin will work just fine.


For the cake:

  • 225g unsalted butter, softened
  • 225g caster sugar
  • 4 large eggs, lightly beaten
  • 225g self-raising flour
  • 1 tsp baking powder
  • Zest of two oranges and juice of half an orange
  • 50g cocoa powder mixed in 80ml hot water
  • 2 tbsp sunflower oil
  • ¼ tsp salt

For the drizzle:

  • 85g golden caster sugar
  • Juice of two oranges
For the ganache frosting:

  • 200ml double cream
  • 175g plain chocolate (40% cocoa), broken up into small pieces
  • 30g butter
Preheat oven to 180c (160C fan).

Grease and line a round, deep 8 inch tin, or if using a bundt/ring tin like I did, grease and dust it lightly with cocoa powder.

For the cake, vigorously beat together the butter and sugar until pale and creamy (use a K-beater if using a freestanding mixer), then add the lightly beaten eggs, slowly mixing through.

Sift the flour and baking powder together three times, before adding a third to the batter. Once incorporated, add another third, slowly beat in again and then add the remaining third.

Once all the flour is incorporated, split the batter into two bowls: In one, fold in the orange zest and juice (don't worry if the batter looks a little loose or runny, it will bake fine); in the other, fold in the cocoa powder, sunflower oil and salt.
For the marble effect, place spoonfuls of the orange batter in your tin, leaving gaps between each spoonful.  Then take your chocolate batter and place spoonfuls in the gaps. Repeat the process a second/third time until all your batter has been spooned out.  Now take a palette knife and gently swirl the two batters together to create a pretty pattern.  I found swirling in figure of eight motions all the way around the tin to be an effective method.
Bake in the oven for 30-35 minutes, until a thin skewer or knife inserted into the deepest part of your cake comes out clean.
To make the drizzle, mix together the orange juice and golden caster sugar.  As soon as your cake is out of the oven, pierce the top in several places with your knife or skewer, then with a pastry brush, gently brush your drizzle across the top of the cake until it's all been used up.
For the ganache, place the chocolate and butter into a heatproof bowl.  Separately, heat the cream in a saucepan to boiling point, then pour it over the chocolate and butter and stir gently until you have a lovely, glossy ganache.  Pour the ganache over your cake and leave to set.

Wednesday 15 August 2012

Chocolate Profiteroles


I made these profiteroles a few weeks back now and was all set to share them with you on A Cup of Tea Solves Everything, but when I sat down to tell you all about them, I found I was suffering an acute case of writer's block.  What to say about why I made them...?  Given the name of my blog, you might well ask why I didn't just make myself a strong brew to solve my problem and get the writing juices flowing again.   Fair enough point you've made there, dear reader.   The problem is, it's currently Ramadan, which means no food or drink for me during daylight hours; and let me tell you, daylight goes on a loooooonnnng time in England in the middle of summer.

So, no tea and no food.  Hmm, for someone as obsessed with food as I am, Ramadan is definitely a challenge.  Every year when it starts, I wonder how I will cope.  A few years back, it dawned on me: my coping mechanism is simply to replace eating obscene amounts of food all day with thinking about obscene amounts of food all day.   Yes, I'm aware that this isn't perhaps the true objective of a spiritual detox, but I just can't seem to help it - much as I try not to, I find myself whiling away the hours poring through my recipe books and trawling online baking sites, dreaming about all of the yummy things I would cram into my mouth there and then were I able to.


This year, during one of my food-filled fasting reveries, I came across profiteroles.   Now who doesn't love a good profiterole?   Well actually, my mum for one, but then again, she doesn't like chocolate desserts in general so I think we all know there's no help for her really (love you mummatha!)   Anyway, I digress.   One of the traditions we have in Ramadan is to have big get-togethers with friends and family to break the fast together at sunset, so I decided I would give profiteroles a go for such an occasion.   That way, I wouldn't just have to dream about them by day, I could eat them by night.   Hurrah!
 

These profiteroles came out nicely but, if you will permit me, I do have two slight criticisms: firstly, I felt that the pastry wasn't filled with enough cream (I opted to fill half with orange-flavoured whipped cream and half with chocolate-flavoured whipped cream. The orange was by far my favourite); secondly both the chocolate cream filling and the chocolate sauce I made were too bitter and not sweet enough because I used chocolate with 70% cocoa content.  In light of these facts, I've tweaked the recipe I've provided below to rectify both of these shortcomings, so hopefully, if I have inspired you to make profiteroles yourself, you won't have the same problems I did.
 
Makes about 30 profiteroles
 
For the choux pastry:
200ml cold water
4 tsp caster sugar
85g unsalted butter
115g plain flour
Pinch of salt
3 medium eggs, lightly beaten

For the cream filling:
400ml whipping cream
Zest of 1 orange
100g plain chocolate (40% cocoa)

For the chocolate sauce:
100g plain chocolate (40% cocoa)
40ml whipping cream
20ml golden syrup
Knob of butter
20g chopped, roasted hazelnuts (optional)

To make the pastry, preheat the oven to 200C (fan), placing a roasting tray in the bottom of the oven.  Grease two or three baking sheets.

Place the water, sugar and butter into a large saucepan and heat gently until the butter has melted.

Turn the heat up and bring to the boil.  Once boiling, quickly tip in the flour and salt.  Remove from the heat and beat vigorously with a wooden spoon until you have a smooth paste that comes away clean from the saucepan.  Set aside to cool for 10-15 minutes.

Beat in the eggs, a little at a time, until the mixture is smooth and glossy and has a soft dropping consistency.
Using a piping bag and plain 1cm nozzle, pipe the mixture into small walnut-sized balls in lines across the baking sheets. Gently rub the top of each ball with a wet finger - this helps to make a crisper top.

Place the baking sheets into the oven. Before closing the oven door, pour half a cup of water into the roasting tin at the bottom of the oven, then quickly shut the door to help create more steam in the oven and make the pastry rise better.  Bake for 10 minutes at 200C before turning the oven down to 180C and baking for another 15 minutes, or until golden-brown - if the profiteroles are too pale they will become soggy when cool.

Remove from the oven and turn the oven off.  Prick the base of each profiterole with a skewer. Place back onto the baking sheet with the hole in the base facing upwards and return to the oven for five minutes. The warm air from the oven helps to dry out the middle of the profiteroles.

For the filling, lightly whip the cream until soft peaks form, then split into two bowls.  Fold the orange zest into one of the bowls of whipped cream.  Melt the chocolate in the microwave or over a bain marie and, once slightly cool, fold through the second bowl of whipped cream.

When the profiteroles are cold, split each one into two.  Fill half the profiteroles with the orange cream and the other half with the chocolate cream before sandwiching the lids back on.

For the chocolate sauce, melt the chocolate and cream together in a saucepan over a low heat.  Stir until the chocolate has melted and you have a smooth paste, then stir in the syrup.  Finally add the butter.

Dip each profiterole gently into the chocolate sauce before stacking onto a plate ready for eating.  Sprinkle with the hazelnuts if using.

Keep refrigerated until about 20 minutes prior to eating.


Tuesday 10 July 2012

Cheesecake brownies


It’s now July and whilst everybody else is looking forward to their summer holidays, I, rather forlornly, am looking back at mine.  Yes, I’ve already had my two weeks of fun, so for a while at least, the closest I’m going to get to feasting on foreign culinary delights is through repeats of the 'Hairy Bikers’ Bakeation' (by golly, I love that programme) on the telly-telly bunkum box.

Still, I mustn’t really grumble as I got to go to Boston this year.  Twinny lives there you see.  I’ll be honest with you, for about 355 days of the year, her living so far away is something I look upon ruefully, but for about 10 days of the year, it has its benefits.

Anyway, as this was my second trip to Boston, I decided that rather than exerting myself with strenuous touristic activities, this time I would take my own bakeation of sorts.  So each day, armed with my laptop, I chose a different bakery in which to while away the hours, surfing the net and sampling the all-Amreekan* goodies the bakeries had to offer.
One such  goody was a brownie.  It is said that brownies actually originated in Boston, so upon my return, to remind me of my holiday, and more importantly of twinny, I thought I would bake some.  These are with a twist as they are cheesecake brownies, which also contain chocolate chunks just for good measure!


The recipe below is one by David Lebovitz and it works a treat as long as you follow my basic rules, which, if you take my advice, should really be adhered to for any brownie recipe:
  1. Always use good quality, high cocoa content chocolate (minimum 70%) for melting with your butter, otherwise your brownies just won’t be rich enough and will taste sweet rather than chocolaty.
  2. Resist the temptation to over-bake.  Brownies should be dense and fudgy in consistency, not cake-like.  If you can bring yourself to take them out of the oven a couple of minutes earlier than the stated time, do so; if you’re worried they haven’t set, put them in the fridge for a few hours before cutting, they’ll be fine.
  3. If adding solid, unmelted chocolate, as called for in this recipe, I implore you not to use poor quality chocolate chips.  They are, quite frankly, pish tosh.  It’s worth the small effort of cutting chunks from a bar of solid chocolate instead.  Besides, that way you get substantial chunks of semi-melted chocolate in your mouth rather than tiny pip-sized chips!
*Amreekan = American in Urdu.  Sometimes, it just works.  Go with it.


Adapted ever so slightly from David Lebovitz

I got 25 mini brownies using an 8"x8" tin

For the brownie batter:
85g unsalted butter
115g chocolate (70% cocoa)
130g granulated sugar
2 large eggs
70g plain flour
1tbsp cocoa powder
Pinch of salt
1 tsp vanilla paste (or extract)
80g chocolate (40-70% cocoa), chopped into small chunks

For the cheesecake batter:
200g full-fat cream cheese
1 large egg yolk
75g granulated sugar
Few drops of vanilla extract

Line an eight or nine inch square tin with foil, ensuring the foil comes up over the sides of the tin, then grease lightly with an unscented oil (I used sunflower).

Preheat the oven to 180C (160C fan).

For the brownie batter, melt the butter and chocolate together, either in the microwave or over a bain marie.  Once melted, stir together to combine, then beat in the sugar followed by the eggs (I used a wooden spoon for the entire recipe, saving on washing up fiddly whisks and electric beaters).

Sift in the flour, cocoa powder and salt, mixing it all into the batter before adding the vanilla paste and chocolate chunks and giving it all another good mix.  Spoon the batter into your tin, smoothing it over so that it's nice and even.

For the cheesecake batter, beat the cream cheese, yolk, sugar and vanilla extract together in a bowl.  Roughly divide this into eight and spoon the eighths into dollops onto the brownie batter in the tin.

Using a spatula (works well if you have an offset spatula), swirl the two batters together before baking in the oven for 30-35 minutes (see below picture to compare the raw and baked swirled batter).

Allow to cool fully before lifting the foil out of the tin, peeling it away and cutting your baked brownies into small squares.