Saturday 24 August 2013

Lime and ginger cheesecake (no-bake)

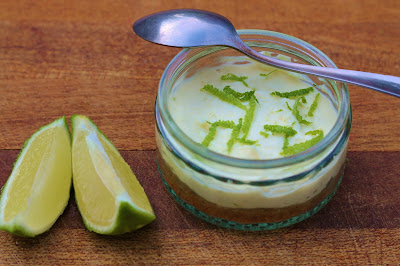
Lime and ginger cheesecake

Big brothers, they're a pain right? They think they know better than you purely because they're a couple of years older (they sooo don't); they get ridiculously overprotective when they see you talking to pretty much anyone from the male of the species; they reckon they know how to make a better cup of tea than you (I don't think so); and then they pretend that they don't read your blog but subsequently tell you that you post too many chocolate based recipes on it. Too many chocolate based recipes??? Pfft, right, like that's even possible!


And I'm not finished there. The litany of complaints continues: despite untold damage to their street cred, they literally hold your hand pretty much every day of your first year at school because you're too shy to talk to anyone and keep blubbering like a baby; they wake up at stupid times of the night to pick you up from the airport after your holidays so that you don't have to make your own way home with your oversized suitcase crammed with beauty lotions and potions and half your wardrobe; they buy you ridiculously expensive chocolates for no reason other than they know how much you love those teeny-weeny salted caramel truffles that cost a small fortune; and to cap things off, they give you darn good hugs and a shoulder to cry on when some loserface breaks your heart.

Lime and ginger cheesecake

So you see, it's like I said, they're a pain. Furthermore, let it be clear that the non-chocolate based blog recipe below is purely to prove a point (this is in fact my second chocolate-free post in a row); in no way is it an attempt to please brother dearest. Hmph.

Lime and ginger cheesecake

I can't take the credit for this recipe. It comes from a lovely colleague of mine, John, who not only was kind enough to make this amazing cheesecake for me, he then let me have the recipe and agreed to let me share it with you on my blog. So John, we salute you!

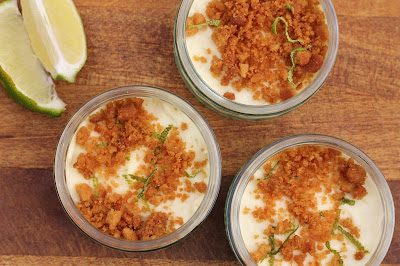
As it's a no-bake cheesecake, this is a pretty easy recipe to follow, yet it tastes incredible; I love the ginger and lime combination. Because I always feel short changed on the biscuit part of cheesecakes, I usually increase the amount of the base, but in this instance, instead I sprinkled extra crushed biscuit on top - almost like a crumble topping - so that you get delicious buttery ginger biscuit either side of the creamy hint-of-lime cheese. I also upped my mascarpone to cream cheese ratio because I love the rich smoothness of mascarpone. Served in individual ramekins, it makes an impressive-looking dessert...even if there's no chocolate in it!

Adapted from my friend John's recipe!

Serves 15-18 (you will need 15-18 ramekins. Alternatively make in one large, shallow dish)
  • 400g ginger nuts
  • 120g unsalted butter, melted
  • 300g cream cheese (I used full-fat Philadelphia)
  • 250g mascarpone
  • 100g caster sugar
  • Zest and juice of 1 lime
Place the biscuits in a food processor and blitz to a fine crumb. Alternatively, place them in a plastic sandwich bag and bash with a rolling pin until they are crushed then place them in a bowl. Add the melted butter to the biscuits and mix thoroughly to combine.

Set aside about a quarter of the crushed butter-biscuit mix in a small bowl, saving it for the topping. Layer the remaining three quarters in the base of your large serving dish or into your ramekins (I made individual desserts and had enough to layer 17 ramekins, filling each one with about three teaspoons of the mix). Press the crumbs down firmly with the back of a spoon or your fingers to even it out and so that it is approximately one centimetre in depth.

Chill in the fridge for 45 minutes to an hour.

Tip the two cheeses, sugar, lime zest and juice into a bowl and beat together with a wooden spoon until well mixed.

Remove the chilled biscuit layer from the fridge and spoon the cheese mix over the base, spreading it evenly so that it is about a centimetre thick.

Sprinkle the remaining biscuit crumbs that you had set aside over the cheese layer for decoration.
Cover with clingfilm and refrigerate again for at least two hours to allow to set.

The cheesecake should keep fine (covered to prevent it from drying out) in the fridge for three to four days.
Thursday 8 August 2013

Sticky date and orange cake

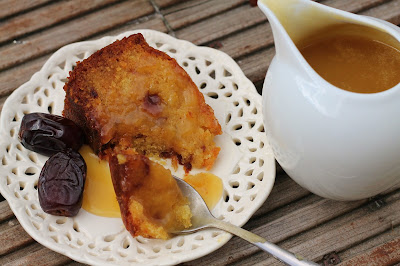
Sticky date and orange cake with toffee sauce

I'd like to tell you a story about dates.

In case you’ve missed the glaringly obvious title of this post and are anticipating some amusing or exciting anecdotes about my personal life - for which you’d be forgiven in light of my aptitude to ramble on about things totally unrelated to baking – I’d better stop you right there.  I hate to disappoint you but no, in this instance I’m talking dates of the edible, fruity kind.

Sticky date and orange cake with toffee sauce and Ajwa dates

Dates and I, we have a chequered history.  I didn’t use to like them.  Every time I tried to eat one, I'd chew...and chew...and chew - like a camel chewing on cud - but I’d find it sticking stubbornly in my throat.  The problem was that I couldn’t understand why, given my passion for all things sweet, I couldn’t form an amicable relationship with something that looked like it should taste of deliciously soft toffee.  Despite my aversion, I so very much wanted to like dates.

So I persisted and then one day, as if by magic, my persistence paid off: I fell in love.

Sticky date and orange cake with toffee sauce

Now that I’ve acquired the taste, I can’t seem to get enough.  I’ll eat all varieties, even at a push the far too syrupy, not enough flesh, under-ripe sort, but preferably plump, juicy, Medjool dates or, better yet, fresh Ajwa dates that frustratingly only seem to be available in the UK during Ramadan (if any food buyers are reading this, please pretty please with a cherry on top could you make them available more frequently, just for me?)

An orange and Ajwa dates

The best thing is that dates are good for you and that, amigos, means that this cake is good for you too!  In fact, as it contains not only dates but oranges too, I do believe we might just have ourselves two of our five a day all wrapped up neatly in one delicious cake!

Okay, so I’m pushing things slightly with that claim but honestly, this cake tasted so scrummy, I find it hard to believe the happiness derived from eating it didn’t do me some good!  It was soft, sticky, damp and yummy in my tummy!

Sticky date and orange cake with toffee sauce
Yields 10-12 slices

Serve either warm as a dessert with hot toffee sauce poured over (see below for recipe), or cold as an afternoon treat with some double cream drizzled on top.

For the cake:
  • 300g butter, softened, plus a little extra for greasing the tin
  • 250g caster sugar 
  • 4 large eggs 
  • 150g self-raising flour, sifted (preferably three times)
  • 150g blanched almonds, whizzed in a food processor until very fine
  • 200g dates, stoned and chopped (I used Ajwa. Medjool will also work but if you can't get either of these, soak standard dates in hot water for 20-30 minutes before stoning and chopping for the cake)
  • Zest of 3 oranges

For the drizzle:
  • 85g golden granulated sugar
  • Juice of 2 fresh oranges

For the toffee sauce (optional):
  • 150g butter, melted
  • 220g soft light brown sugar 
  • 200ml double cream

To make the cake
Preheat the oven to 170C (160C for a fan oven) and grease a deep, 8" round cake tin before lining the base with baking paper.
Beat the butter and sugar together until light and fluffy (use a paddle attachment if using a freestanding mixer).  Don't try to save time here - beat for a good few minutes to get a soft mixture and to incorporate lots of air as the air is what will give you a light cake.
Break the eggs one at a time into the butter and sugar, beating very, very slowly after adding each egg to incorporate it without the mixture curdling.  If it looks as though it's curdling, add a spoon of flour with each egg and continue to beat.
Add the almonds and the rest of the flour and beat until you have a glossy batter.
Finally add the chopped dates and the orange zest and stir together gently until combined before spooning the mixture evenly into the prepared tin.
Bake for 10 minutes at 170C (160C fan) before reducing the oven temperature to 150C (140C fan) and baking for another 60-65 minutes or until a knife or skewer inserted into the centre comes out clean. If you're worried about the top of the cake burning, cover it loosely with foil after about 45 minutes of baking in total to prevent this from happening.
To make the drizzle
While the cake is baking, make the drizzle by combining the sugar and orange juice together and stirring to combine.
As soon as the cake is out of the oven, leaving it in the tin, prick it all over with a knife or skewer.
Spoon the drizzle evenly all over the cake and then leave it to seep in.  It may look like too much drizzle but it will soak slowly into the cake, ensuring a moist sponge throughout.
Once the drizzle has all soaked into the cake and the cake has cooled a little, you can remove it from the tin.
For the toffee sauce
Melt the butter in a small saucepan over a low to medium heat.  Once it's melted, add the brown sugar and cream, and stir to combine. Simmer for five minutes until you have a thick pouring sauce.
The toffee sauce keeps in the fridge for a few days and can be reheated either over a gentle heat on the hob or in short bursts in the microwave.